Monday, March 16, 2009

Improve Your Photography - Part 4, Intro

Pixels and how they see light

Definition- Pixel- A contraction of the term picture element, a pixel in a camera is a light
sensitive electrical unit that captures light as it falls on it. A pixel can only capture one colour of
light; hence, digital cameras have pixels that capture red, green and blue, surrounding each other.
This allows an image to be captured correctly. A pixel on a computer screen is not light
sensitive- it is a square of light that shines a single colour as part of a whole image. A megapixel
is Equal to one million Pixels

Image size- The image size that cameras advertise often run into the millions. I.e. A 6 million
megapixel camera. This is a huge number and is determined by a simple multiplication of sides
of the sensor.

By multiplying the two sides of the sensor, we get to the figure of 6, 049 080 pixels- or 6,05
million megaPixels.

photography courses, improve your photography, nature images, shem compion, c4 images and safaris


Digital zoom vs. Optical zoom

Digital cameras often advertise a zoom on a camera as being 15, or even 20 times in length.
It is even advertised on digital video cameras as going up to over 100x zoom! This is very much a
marketing ploy on the optical Zoom.

Optical zoom is just what it says it is: the camera uses the optics of the zoom on the camera to
zoom into the image and compose the image. The sensor reads the light as it falls through the lens
and uses the lenses magnification powers’ to create its image. This means it is relying on the clarity
and quality of the lens to make its image.

Digital zoom uses the power of the sensor to create its image. Once the power of the lens has been
used up, i.e. it’s at full magnification; the camera then zooms in on the sensor to make the image
larger in the frame.
Much like cropping into an image on a computer screen, the camera is cropping into the sensor and
magnifying what is in the middle. This then produces your zoom effect. As you might have
noticed, there is one inherent flaw with this method- there is a proportionally greater loss in image
quality the more you use the digital zoom. This produces images that may not match other prints
where the digital zoom was not used.

Settings on a camera

• Auto mode is good for taking images in every day snappy mode.
• P mode is better as it gives you more control. You choose when the flash goes up, thus
allowing you more creative control
• A, S, M Modes are used for more control by the user. If you are comfortable using these
modes, then by all means use them.
• Exposure compensation (+/- button) is an easy way of altering your exposure.
o If an image looks too dark on the LCD, then dial in some add (+) exposure
o If an image is too light, then dial in some (-) into your exposure
• Focus mode. Make sure you know how to focus on a subject and then hold the focus while
you re-compose your image
• Burst mode- know where your burst mode is for action and sports
• Vari modes- these are in camera settings with the running man, mountain, flower etc. They
are an excellent way of allowing the camera to make the decisions for you regarding your
choice of photography.

For more information on Photography courses and how to improve your photography see here.

photography courses, improve your photography, wildlife images, shem compion, c4 images and safaris

All text copyright C4 Images and Safaris


Read more!

Monday, March 9, 2009

Improve Your Photography - Part 3, Intro

Limitations of digital cameras

The limitations of a digital are the same as those of any camera. Of the electromagnetic spectrum, we as humans can only see a tiny portion. This is called the visible light spectrum. See below.

photography courses, improve your photography, shem compion, c4 images and safaris

There is light on either side of the light spectrum; our eyes just cannot see it.
The difference in light intensity between dark black to brilliant white is 14 times intensity. Each of these intensities is called ‘stops’. Our eyes can easily absorb the difference of light between each of these 14 stops. Thus, on a sunny day, our eyes can see detail of a sunlit park as well as in the shadow under the tree.

A camera on the other hand, has serious limitations with regards to what it can record at any given time. See below.

photography courses, improve your photography, shem compion, c4 images and safaris

A camera can at any one time only record:

Black and white film - 9 stops
Colour print film - 7 stops
Slide film - 5 stops
Digital - 5 stops

This shows obvious restrictions to cameras. High contrast scenes cannot be recorded properly and the camera will either give very white, blown out areas, or dark black areas in high contrast scenes. Sometimes this can be used to the advantage of the user and can help with their creative ability.

For more information on Photography courses and how to improve your photography see here.

photography courses, improve your photography, shem compion, c4 images and safaris, nature images

All text copyright C4 Images and Safaris

Read more!

Wednesday, March 4, 2009

Improve Your Photography - Part 2, Intro

Introduction to Digital cameras
A short history on digital cameras

In the 1980’s, with video cameras becoming more and more popular with consumers around
the world, there were thoughts of attempting the same thing with still cameras. Only a few companies actively pursued these notions. Two of them were notably, Sony and Kodak.

Kodak had begun research into digital cameras from as early as 1975, when they produced the first digital camera in a laboratory. This camera, designed by Steve Sasson, was about the size of a large microwave.

Kodak dedicated their research towards still cameras and, coupled with a Nikon F3 camera, they produced the first digital camera with a 1.3 megapixel (mp) sensor. Once the world heard of this, there was a large scramble amongst companies to get their R+D divisions into looking into digital imaging. The race had begun, and it was an unusual camera maker that made the first commercial digital camera. The Apple computer company, in 1994, produced the first consumer digital camera. It looked somewhat like a pair of binoculars and took tiny images for computer screen use only. But it was the start and Kodak and Sony soon followed suit with their own cameras in the same year. After a few years of bad design and computing logistical nightmares, all major camera companies were actively involved in the digital imaging research.

I believe that Nikon made the first major breakthrough in pro digital imaging. In 1999, just in
time for the 2000 Olympics in Sydney, Nikon released the D1 camera. It was a Professionally built camera, with a 2.1mp sensor and a buffer that allowed it to take 4 frames a second for about 18 frames. A major advancement in showing the world that digital was ready for the fast moving sports and journalism world. The response was immediate: At the Olympics the following year, almost 80% of the cameras used by the Sports photographers, were Nikon D1’s. After this point, companies and public realised that digital cameras were here to stay and were a part of our lives.

In the film world, a specific camera was generally replaced every 7 years or so. In the digital arena, some camera makers were turning over new models of the same camera every 14 months! More recently, camera companies are touting ‘Intelligent pixels’. This is very true that all pixels are not the same and if a pixel in one camera can capture a ray of light better than another pixel, in another camera, you are going to get a better image. Hence, more marketing has now gone into this part of the market- where companies are selling image quality rather than quantity. It reflects the true nature of the market though, as people want good images, and not large files of bad quality.

nature images, photography courses, improve your photography, shem compion, c4 images and safaris, african photography information

The advantages of digital over film

There are many immediate advantages that digital has over film.
They are:
o A LCD screen to instantly review your images. For novices, this is great to check up
on composition, whilst for the enthusiast and professional, it is an excellent tool to
review exposure on.
o EXIF data on image. All the camera settings at the time of shooting the image are
automatically tagged onto your image. This allows you to see what date, time and
exposures you shot your image at.
o Print only the prints you want. This is a cost saving exercise par non.
o Shoot as many images that you like with the option to delete bad images. Another
cost saver and also an opportunity for people to experiment more with photography.
o Edit your own pictures. This feature has turned many casual photographers into
Photoshop experts! Users, can with very simple software, edit, manipulate, add
borders, text and make cards for all manners of use.
o Memory cards have more capacity for images than film. Now cameras can hold
hundreds of images on one memory card, making travelling a lot easier.
o Memory cards can be reformatted to allow continual use.
o Different file formats can be selected for various uses. An image format in camera can be used for e-mail quality images and another for print quality images.
For more information on Photography courses and how to improve your photography see here.

nature images, photography courses, improve your photography, shem compion, c4 images and safaris, african photography information

All text copyright C4 Images and Safaris


Read more!

Wednesday, February 4, 2009

Improve Your Photography - Part 1, Intro

An introduction to course and digital cameras

Introduction

Photography, like most arts, is a combination of science and art. A painter needs to know his tools
and his paints very well before he can start working masterpieces. This often takes years off
technical training and skill. Photography was the same until a few years ago. Film based cameras
made the learning process a slow, tedious and expensive one. If a student was serious about
photography, then each exposure had to be recorded as photographs were taken and then linked to
the actual photo when the printing had taken place. Now we have the joy if instant feedback via
LCD on the back of the camera. This has made the learning process exponentially faster, and even
more so with training. Feedback can be delivered in a matter of seconds and this really accelerates
the learning curve. However, the fundamentals of photography still remain and the basics of shutter
speed, aperture and exposure remain the foundations of photography.
What this course delves into is the fact that cameras now do almost all of the science for us. With
this confidence in the bag, we can thus concentrate on actually improving technique and images
through your creativity.

photography courses, improve your photography, washline images, shem compion, c4 images and safaris


Philosophy of course

Teach clients to see the Art of photography through their own creativity.
Improve the results of their images through practical application of the lessons taught

Science vs Art

As mentioned, every photograph is a combination of science and art.
Science is the actual combination of shutter speed and aperture to create an exposure that is
pleasing to the eye. It is the basis of every image taken with every camera. If the exposure is
incorrect, then an image won’t work and be discarded. Many people concentrate on producing
technically precise images. Hours can be spent on producing an image that has the correct depth of
field with the corresponding correct shutter speed to ensure that an image is exposed perfectly. An
image like this can often be exceptionally boring. And luckily for us, we have the advantage of
technology on our side. As a professional photographer, I use the cameras meter readings for my
photographs about 85% of the time. I believe that for about 90% of all images, a camera will
produce the correct exposure.

This makes the photographers life a lot easier and now there can be more concentration on actually
taking a picture that looks good. A camera that takes well-exposed images is the biggest boon to a
photographer as they can concentrate on making a good image with their own creativity.

Art- The ability to create balance in a photograph. Balance is created via a combination of
light, composition, feel and colour combinations. Other factors like iso and depth of field are
technical methods that help creativity.

What is creativity?

Creativity- The art or power to invent. The ability to create knowledge/ingenuity.
In photography, and through creative use, images can:

• Tell a story
• Create atmosphere, mood and feel
• Compliment colours and create balance
• Lead a viewer into an image
• Create anticipation
• Give intrigue

For more information on Photography courses and how to improve your photography see here.

photography courses, improve your photography, c4 images and safaris

All text copyright C4 Images and Safaris

Read more!

Monday, January 26, 2009

Skimmimg the Light, Okanvango Pan handle, Botswana

October on the Okavango River is the end of the dry season, meaning the river level is low- low enough to expose sandbanks; which in turn attract a few species of birds to nest on them. One of the birds we wanted to photograph was the African Skimmer. A large, striking black and white bird with an orange-red bill, the African Skimmers’ status fluctuates between near-threatened and endangered in the Red data book and was until recently described as locally extinct in South Africa.
nature photographers, okavango river
The reason why they are threatened species? When Robert’s Bird book states that skimmers nest on open, exposed sand banks, they aren’t joking. The first few days on the river we noticed hippo tracks right next to nests, crocodiles sunning on the banks next to skimmer nests and elephants walking through the reeds near sand banks. Without any human interference, I could clearly see how nests could be so easily destroyed. And that is before a herd of buffalo comes down to drink; which is a common occurrence further down the river…

So it was with dismay that on our last day on the river that our guide took us past a sandbank that had about 10 nesting pairs on it. As we rounded the corner, I was amazed to see three mokoros (dugout canoes) on the sand bank and 6 men fishing on the bank. Of course the skimmers were going ballistic and their chicks were scurrying around in the scant grass cover on the sandbank. I was livid and after convincing our driver, we boated up to them and asked them very nicely to leave. It all ended well and they agreed to leave the sandbank, but the reality of the situation was there for all to see. These birds really do breed in marginal conditions and in a very small time frame- seeing all these interference as we did; their vulnerability became very apparent.

Thus I pose the question- what are our images doing to help species such as the African Skimmer? The large numbers of bird photographers, fisherman and tourists who visit this specific area, pumping hard currency into the lodges, are evidently not having much visible and practical effect on the ground. We saw the result right there with those fishermen.

It’s been something I have been thinking about for a while now: “What influence do the photographs we take have?” It’s a question that provokes a lot of interest from conservationists and nature photographers alike.
I’ve heard arguments that photographs, just by being printed in media, create awareness of the species or places they represent. That may be somewhat true, but it’s not of direct benefit to conservation. Through some mediums they do affect their conservation, but what does a certain brand of Brandy actually do for the status of the Fish Eagle that they use as their Symbol; Other than draw metaphors between the bird they represent and their brandy? We see nature and wildlife represented in the media every day but with very little or no actual benefit to the actual species or areas they represent.

This question was brought to the fore when photographing the skimmers. I always like to photograph subjects in unique ways and especially in different light. This was exactly the same here. I was very keen to represent this bird in a different manner to the norm. Seeing the results, of which this is one, it struck me. “If I want to show subjects in a new manner, or different light- why is that?” The answer became quite clear: “To make people appreciate these beautiful creatures”. If people appreciate, they will respond. But it had to go one step further. I still feel that an image on its own is just that- an image.

That is how the inspiration for ‘Mutual Benefit’ came into being.
To be able to make my images worth more than their commercial value, I decided to make them available to all natural history research, education facilities and conservation projects- FOR FREE.
This is my way of giving something back to the places I visit with all the photographs that I take. These images now have a unique opportunity to be part of science, teaching, learning and research- attributes which directly contribute to the saving of the animal species we love to photograph so much.

Thus this image is quite poignant- the skimmer is flying in the absolute last light of day. Does it represent a future fading into darkness through lack of conservation and research, or does it represent a new dawn of forward thinking and pro-active conservation?
The optimist in me believes in the latter. Also, I know this image was taken in the first light of day…! Significant?
I hope so.


Exposure information
Nikon D300 - 200-400mm
Exposure – f 5 Shutter Speed: 1/1000sec
Exp. Comp. - 0. EV
ISO - 500
Flash sync– not attached, Exposure mode– Manual, Metering Mode– centre
File type– NEF (RAW)
Focal length: 380 mm (570mm 35mm Equivalent)
Handheld on Boat

This article first appeared on shemimages.com

Read more!

Sunday, January 25, 2009

Ocean stars. Whale trail, Southern Cape, De hoop Nature reserve.

Over the last year, I have been working on small, but very specific, personal project. It’s got no time constraints or deadlines. I just want to put together a few images- with the same theme- that conveys a strong message. A message that I believe strongly in and one that I think people should know about: a small contribution to conservation. I suppose you could call it a photo essay (excuse the pun…), but I would rather see it as a collection of images of conscious thought.

essay42

One of my favourite sayings is that “Life is too short to drink bad wine”, although I surely didn’t believe that in my student days… There is a lot behind those words and they ring quite true to the statement.
If a wine maker decides to make a good wine, first he has to choose the land, or the terroir, for the vines to grow on. This is very important: If the soil is too loamy or to clayey, the vines will either drown and die very quickly or they will produce fruit that is juicy, plump and only good for eating as a grape from the greengrocer.

Vines like hard, dry, rocky, unforgiving soils on which to grow. I can’t tell you exactly why, but they do- and once planted there, they need a lot of love and care. A good fruit for wine is one that produces a small fruit with all the flavour put into the skin. Why? because wine gets its flavour from the skins of the grapes, not the flesh.

So the conundrum for the wine maker: plant a vine in hard ground, water it too much and give it too much love and all you will get is a nice juicy grape good for eating. But leave it be and it wont fruit at all. There needs to be a balance- coax the vine, tease the vine with small amounts of water so that it thinks it must produce fruit, and it does produce fruit. But the fruit it produces are small and with little juice, and the skin that covers them is thick, full of tannins and makes for excellent wines. The vine works hard, in near unforgiving circumstances, on the brink of surviving and reproducing to produce a little miracle. So a very fine balance is struck- make the plant suffer slowly, but not too much- and from that will come the ultimate reward.
This is all very easy to say. But only the top wines in the world manage this formulaic balance.

Photographing the night skies may be an easy thing to say: pop out there, aim camera at sky and snap away. Well I found out it is not as easy as that so my little personal project: To photography night skies in natural, wilderness areas to show the beauty and vastness of the night.
There are a few immediate problems here; ambient light from towns travels a long way. You really do need to be in a wilderness area, far from any lights to not get any interference from man-made lights in an image.
Then, the weather… This has been the crux of the matter. Of the 12 nights in the Kalahari, 5 nights on the cape coast, 13 nights on the Mozambican coast, 6 nights on the west coast and numerous other nights in wilderness areas I can count on one hand the good nights I have had to photograph on. The combination of clouds, smog, and mist often contributed against me.

Getting to wilderness areas is difficult enough, but managing to find the right conditions to get good results makes this a story of perseverance. Watching the stars is becoming as rare as seeing a cheetah kill. This is more about showing someone the stars. It is showing the night skies as we are supposed to see them; when no cities were polluting the air and smog wasn’t a household word.
In this age of pollutants and city living, getting out into wilderness areas is even more important than ever, if only to smell the fresh air. Another part of being out there is seeing those vast night skies. When you see them, you know you are far away from anything man made- and to me there is great value in that alone.
That has become my project- to show people the beauty of the night skies and encourage them to get out into wilderness areas to experience those stars stretched across the velvet sky. If things carry on as they are, it may become even more rare than seeing a cheetah kill…

And so it is like wine- a simple project that teases, coaxes and tempts me for images. When at first it seemed quite simple, I found there is actually a fine balance between suffering and success. I hope in the end we see real reward of it all.

I hope to show you the final result of the project soon- for now, this image is from the Cape coast, taken on the whale trail hike.


Thanks to Pieter Walser for the late night call about the wine facts. If you want great wine, have a look at his website. Moment of silence took me by storm! www.blankbottle.co.za

Exposure information
Nikon D300 - 12-24mm lens
Exposure – f 5.6 Shutter Speed: 1024 sec (17minutes)
Exp. Comp. - 0. EV
ISO - 200
Flash sync– not attached, Exposure mode– manual, Metering Mode– matrix
File type– NEF (RAW)
Focal length: 13mm (20mm equivalent)
Tripod and cable release

This article first appeared on shemimages.com

Read more!

Friday, January 9, 2009

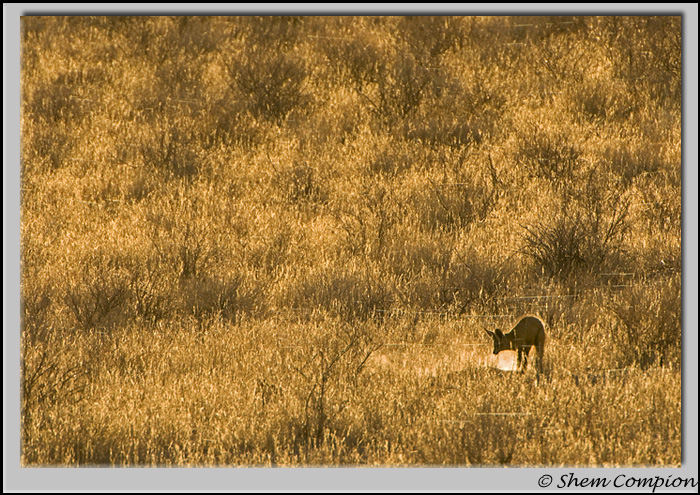
Bat eared Fox, Kgalagadi Transfrontier Park, SA

Style. The word has many meanings. To some it is the type and manner in which you wear your clothes. A snowboarder either has a good riding style or a bad one. In sports, style is even judged in competitions- surfers are judged, amongst other attributes, on the style in which they ride a wave.
In the sports, style usually comes with time. A more natural feel for what the person is doing and in doing so, the body naturally relaxes and “style” improves.
Style can also be a reflection of the times. Artistic styles have come and gone. A certain style that is en vogue this century certainly will have changed by the next.
There are even management and business styles. Remember the bold coloured ties of the 80’s- yes that was a style- and they were supposed to represent assertiveness… That is just an example of a management style mixed with bad fashion sense- but there have been and are many different styles in which businesses are run.

essay-43
In Photography, there too, are many different styles. Actually, from the outset, when photography was invented, in 1835, there were two different styles that developed. These helped defined photography as it is today, but at the same time split the world as to what photography actually is. Is it an art form, or is it a representation, a documentation? These were philosophies that helped developed the medium, but we can talk about that another day.

Basically, the style of photography has many forms and guises. In nature photography, there are very distinct styles that vary according to geography. The Americas, the UK, the Scandinavian countries and east and southern Africa all have very distinct and varying styles. You may ask how is this possible- surely there is some overlapping. Well no. They really are different and if you want to improve your photography, then studying the different photographic styles from each region will be of great help. Being one who practises what he preaches, I have lately been really intrigued by the style of the Scandinavian photographers. The intimacy that they get in an image as well as the strong use of composition has had me studying their images late into the night. But what has really kept me in front of the computer in those late hours is their use of light. Perhaps it is their lack of light up there in the north, but when they get good light, they sure know how to manipulate it to their advantage.

Back to this months photo essay; this last week I was in one of South Africa’s jewels- the Kgalagadi Transfrontier Park (see here for more info on a Photo Workshop with C4 Images & Safaris to KTP) with camera, naturally, in hand.
Early one morning, on the far side of the riverbed, some backlit dust caught my eye. The scene of this bat eared fox scratching for insects against the backlit grass and spider webs was immediately apparent. Yet I was about 150m away and I couldn’t fill the frame at all, so it had to be the environmental image.
At first it was a difficult image to work, but the more I framed it with the camera, the more I liked this image, so I took a good few different compositions. Driving on I pondered sighting and how it had appealed to me the more I studied it. It then dawned on me: I had read the situation completely differently to how I usually take images. I thought back to how I would have reacted to this scene 4 years ago. I concluded that I would have most probably just watched this scene in my binocs and not taken a photo at all.
Then the realisation: My style had developed and changed. I now see photo opportunities in a different light (excuse the old pun) to those a few years ago. As with anything, development has to happen, as well as change.
I suppose it’s a development of style and any person in any profession has to continually stay ahead of the pack if they want to be on top of the game. As long as my style doesn’t represent those ties of the 80’s, then I’m happy it’s developing and changing…

Enjoy!

For more info on going on a Photo workshop to improve your photography, visit C4 Images & Safaris.

Exposure Information:
Nikon D300 - 200-400mm lens and 1,4 converter
Exposure – f 7.1 Shutter Speed: 1/1000sec
Exp. Comp. - 0. EV
ISO - 400
Flash sync– not attached, Exposure mode– Aperture priority, Metering Mode– centre
File type– NEF (RAW)
Focal length: 550 mm (820mm 35mm Equivalent)
Beanbag from vehicle

This article first appeared on shemimages.com

Shem Compion

Read more!

Thursday, January 8, 2009

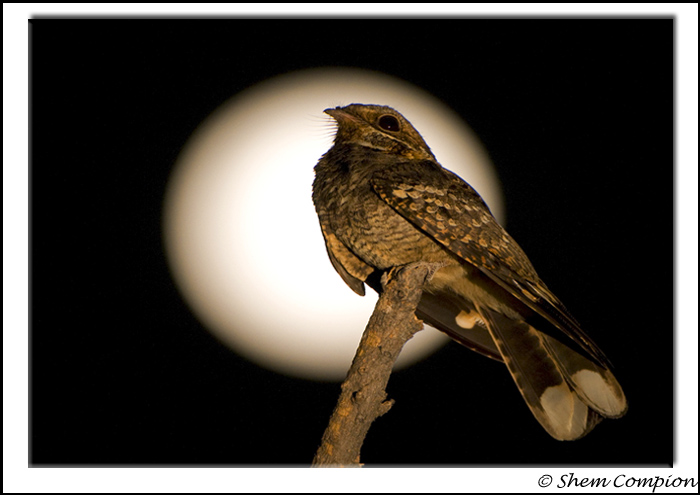
Fiery-necked Nightjar, Botswana

There are a few sayings with regards photography that ring true to getting good wildlife images. The most commonly used is: “patience, patience, patience” and it is very true. Most top class wildlife images are a result of hours of field work waiting patiently for a situation to develop; time spent in hides and driving bad roads searching for decent subjects to photograph.

essay-421

I always say that lion researchers and nature photographers are of the same ilk. For many hours we watch animals doing nothing and when they do something quite ordinary we humans get quite excited by it all. “Well as long we are out there” is another photography saying. This is normally uttered in reference to a day where everything was perfectly in place: the storm clouds had built up in the east creating a beautifully dark slate grey sky as backdrop, the sun has just peeked out from under the same clouds in the west and is casting a golden glow on a lovely open plain. But the subject doesn’t arrive and nothing of great value is photographed. We say these things when we are actually bitterly disappointed about how promising things were, and so we console ourselves that it was good to be out there. Of course it was good to “ be out there”, but hell, we were searching, scouring for a subject to do the scene justice. But that’s just how nature photography works, it tempts, frustrates, teases and plays with your mind until you either give up, or eventually something of value appears and you “get your shot”. That is probably what separates the goods from the greats in our game.

And that leads onto this month’s image and the saying that goes with it- “being prepared”. As much as nature photography tempts us, nature can reveal small beauties in a very short space of time and this is where “being prepared” comes in. I was camping with some bird photographers on the side of a river course on the Okavango River, taking daily boat cruises to go photograph (you can see a collection of the images here as well as on my blog).
On the first evening there, I noticed a fiery necked nightjar perching on a stick on the outskirts of our camp. We ran to pick up our cameras and managed to get a few images of it. However, the image I wanted was of the full moon rising behind it. I tried, but the moon was quite high and a buffalo thorn was hampering my progress to get the angle I needed. (actually it was tearing at my shirt and skin…)
The following night, I was prepared. I knew the moon would rise about 45 min later, so anticipating the nightjar would land on the stick at around the same time, the moon would be just in the right place to be behind the bird. (Another aspect of photographers is their high level of optimism!) I had my camera setup and at the ready. Now I just needed to have the bird do its thing.
For once, everything fell into place. The nightjar arrived on the minute, the moon was positioned perfectly behind it, Dave Barnes lit the bird softly with a light and I snapped off a quick sequence of this beautiful bird.
Easy as that, job was done. Lord Baden Powel would have been proud.

For more info on going on a Photo workshop to improve your photography, visit C4 Images & Safaris.

Exposure information
Nikon D300 - 200-400mm lens
Exposure – f 4 Shutter Speed: 1/100sec
Exp. Comp. - 0. EV
ISO - 1000
Flash sync– not attached, Exposure mode– Aperture priority, Metering Mode– spot
File type– NEF (RAW)
Focal length: 400 mm (600mm 35mm Equivalent)
Handheld

This article first appeared on shemimages.com

Shem Compion Read more!